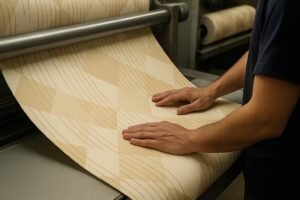
Choosing the right wallpaper for wall is one of the simplest yet most impactful ways to elevate your interiors. From luxurious textures and elegant patterns to bold prints and subtle finishes, the right design can completely redefine a space—adding warmth, personality, and sophistication that paint alone can never achieve. Whether you’re decorating a living room, bedroom, or office, selecting high-quality wallpaper for wall instantly creates a statement and transforms your environment into something truly special.
However, even the most beautiful wallpaper can appear uneven, bubbled, or poorly aligned if installation isn’t done correctly. A single mistake during surface preparation, measurement, or pasting can undo the effort and investment you’ve made. At Eximus Wallpaper, India’s first wallpaper manufacturer, we’ve seen how avoidable installation errors can compromise an otherwise stunning design. That’s why understanding what not to do is just as important as knowing how to choose the perfect wallpaper for wall in the first place.
In this detailed guide, we’ll walk you through the most common mistakes to avoid when installing wallpaper for wall—from surface preparation and adhesive application to pattern matching and finishing. Whether you’re a DIY enthusiast refreshing your living room or a homeowner working with professional installers, these expert insights will help you achieve a flawless, long-lasting result that keeps your walls looking impeccable for years to come.
1. Mistake #1: Skipping Wall Preparation
Why it matters
The surface behind your wallpaper is the foundation of the entire job. If the wall is uneven, dusty, damp, or previously poorly treated, the wallpaper may not adhere correctly, leading to bubbling, peeling, or misalignment. According to industry guidance, “wallpaper sticks best to a clean, dry, and smooth surface. Dust, grease, or even subtle texture can cause peeling, bubbling, or uneven adhesion.”
What to do instead
- Remove old wallpaper or paint residues. Don’t just wallpaper over previous coverings unless they are absolutely flat and secure.
- Fill any cracks, holes or uneven patches with suitable filler; sand the surface smooth.
- Clean the wall thoroughly: remove dust, grease, oil, and wash if needed. Let it dry completely.
- If the wall is a new plaster or has absorption issues, apply a suitable primer or sealer so the wallpaper adhesive works correctly.
- Use a spirit level or straightedge to check for major bulges or slopes; correct as much as possible to get a flat plane.
Why many people skip it
Because wall prep takes time and looks like “nothing is happening” compared to the glamour of choosing patterns. But this is where the job can go wrong—and fixing errors later is far costlier than doing it right at the start.
2. Mistake #2: Choosing the Wrong Wallpaper for Your Wall and Space
The issue
Not all wallpapers are equally suitable for every wall or environment. For example, choosing a delicate natural fibre wallpaper in a family high-traffic area or a vinyl wallpaper in a damp bathroom without checking the specification can lead to failure. One source states: “Not every wallpaper can be installed in any location… natural wallpapers such as grasscloth are not water-repellant, so their colours may run in areas with high humidity or fade in direct sunlight.”
How this plays out
- A wallpaper meant for low-traffic, dry areas may degrade quickly in a hallway or children’s room.
- A wallpaper printed in one dye batch may look different from a reordered batch (dye-lot variation) if you didn’t order enough at once.
- The scale of the pattern may not suit the room size (large prints in small rooms can overwhelm, fine prints in large rooms may get lost).
What to do instead
- Consider function: Is the space high-traffic? Is there moisture or direct sunlight?
- Consider pattern and scale relative to the wall size.
- Order sufficient quantity of wallpaper at once (preferably all the rolls needed for the job) to avoid dye-lot mismatches.
- At Eximus Wallpaper, choose from materials and finishes suited for Indian homes: from washable vinyls to textured non-woven, and always review the technical specs.
- If you’re installing in a tricky location (behind a kitchen stove, in a bathroom, near windows), consult the manufacturer or installer about suitability.
3. Mistake #3: Incorrect Measurement & Insufficient Quantity
What often happens
Many DIYers or even professional installers make the error of under-estimating how much wallpaper is required. Pattern repeats, waste for trimming, and corners/obstacles all add up. One article states: “Miscalculating the required amount can lead to running out mid-job; it’s advised to order 10-15% more than needed.” The Spruce Another states the importance of ordering extra so that colours remain consistent: “Always order extra wallpaper.” Architectural Digest
Risk of running out
- Having to reorder later and getting a different dye lot, causing visible difference in colour or texture.
- Facing delays in installation.
- Wasting time and cost by having to match old stock.
- Additional wastage if you have to cut awkward bits.
How to avoid it
- Accurately measure all walls to be covered: height, width, number of doors/windows, alcoves, and corners.
- Add 10-15% extra roll allowance for pattern matching, trimming, and mistakes.
- Check the pattern repeat length and width: if your wallpaper has a large repeat, you may need extra length or can’t use off-cuts from one roll for another section.
- If your brand (Eximus Wallpaper) offers a waste-calculator or measurement guide, use that to assure sufficient order size.
- Store leftover rolls safely for future repairs.
4. Mistake #4: Starting Without a Plumb Line (Not Establishing Level)
Why alignment matters
Wallpaper installation is a linear process: the first strip sets the alignment for every subsequent one. If the first strip is off-level, the error propagates across the wall and the fault may become very visible (tilted pattern, mismatched seams). One source advises: “If you don’t use a level or plumb line to set a proper starting point, the pattern will start tilting—and by the time you notice, it’ll be too late.”
Consequences
- Seams will not align vertically or horizontally.
- The entire wall may appear skewed.
- Rework is required (which adds cost and time).
- The aesthetic effect is compromised, especially if you picked an accent wall or large pattern.
What to do
- Before you apply the first strip, use a spirit level or laser level to draw a vertical line from floor to ceiling (plumb line) in the corner where you begin.
- Ensure the ceiling and floor are level; if not, compensate accordingly.
- Start installing the first strip along this line.
- Regularly check alignment as you go along subsequent strips.
- For large or complex panels (murals, large-scale prints), plan the layout on the floor before application.
5. Mistake #5: Incorrect Surface Paste or Adhesive Application
The pitfall
Wallpaper adhesive or paste is not “one size fits all.” The type of wallpaper, backing, surface type, and even ambient humidity/temperature influence what adhesive to use and how. If the wrong adhesive is used—or if paste is applied incorrectly—this can cause bonds to fail, seams to open, or curling edges. For example: “A possible cause for seams opening after wallpapering could be a blocked substrate, draught or too fast drying of the individual strips.”
What can go wrong
- Adhesive too weak for the backing → wallpaper peels prematurely.
- Oversaturating the wallpaper with paste → swelling, distortion, edge lifting.
- Undersaturating or uneven paste application → poor adhesion and bubbles.
- Using generic adhesive rather than one recommended for the wallpaper backing type (e.g., vinyl, non-woven, grasscloth).
- Installing in too cold/hot/humid environment without adjusting approach → adhesive fails.
Best practices
- Check the manufacturer’s recommendations (Eximus Wallpaper provides guidance for each wallpaper type).
- Use the correct adhesive specified for the wallpaper backing and wall surface.
- Apply paste evenly: often to the wall, sometimes to the paper, depending on backing instructions.
- Follow the dwell time or “book time” (if required) for pre-pasted wallpapers.
- Maintain the room at a stable temperature and ventilation during installation for optimal drying.
- Use the right tools: roller/brush for adhesive, smoothing tool to remove bubbles, seam roller for edges.
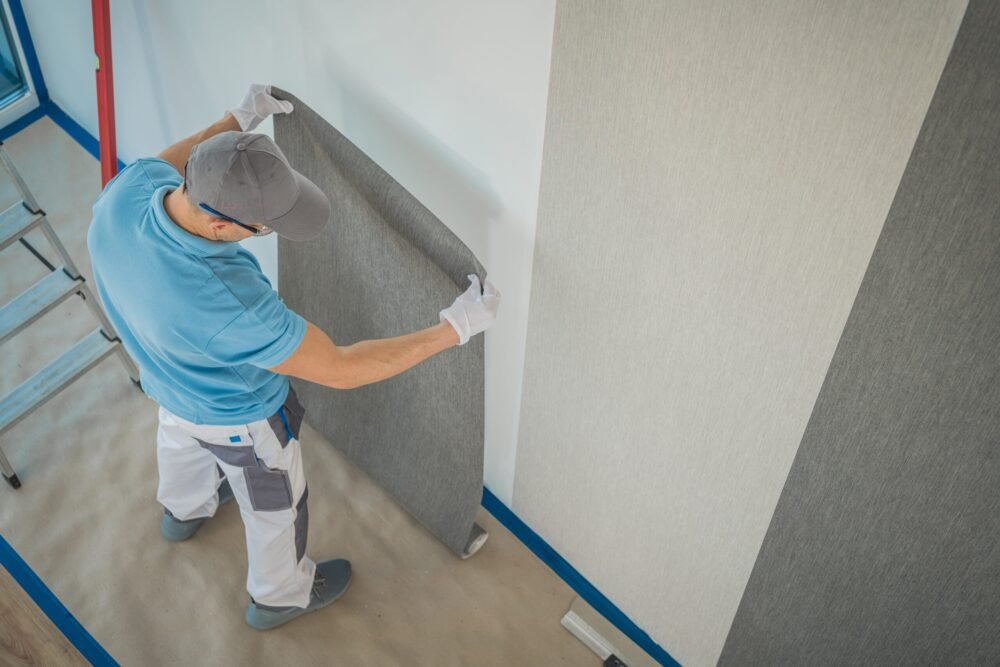
6. Mistake #6: Matching Patterns and Seams Poorly
The challenge
Matching bold patterns, large repeats or complex prints demands precision. One of the biggest visible mistakes is misaligned seams or patterns that jump or shift between panels. According to Better Homes & Gardens: “One of the most difficult parts about installing wallpaper is making sure the patterns match up perfectly… Do not match the wallpaper strips on the wall as you go. It’s slow going, and you could overstretch the paper, making it difficult to match.” Better Homes & Gardens+1
Common mistakes
- Cutting the next strip before aligning the previous panel, so pattern mismatch happens.
- Stretching or pulling the paper when applying—this distorts the pattern.
- Starting installation without laying out strips in sequence—resulting in off-pattern or waste.
- Using wallpaper from different dye lots without checking for consistency.
Best approach
- Lay out several strips on a flat surface before you begin installing. Compare patterns and ensure they align.
- Mark back of paper for sequence (e.g., panel 1, 2, 3) to keep order.
- Use excess length at top/bottom to trim later for a perfectly aligned finish.
- When working with wallpapers that have large repeats or “drop” patterns, calculate extra length for alignment.
- Use leftover off-cuts when possible to fill smaller surfaces (but ensure pattern match and dye-lot consistency).
- For critical accent walls, consider hiring a professional installer to guarantee flawless seams.
7. Mistake #7: Rushing the Installation Process
Why haste harms quality
Wallpaper installation isn’t a quick job—taking shortcuts usually leads to visible mistakes: bubbles, misalignment, poor trimming, uneven adhesion. One article says: “Although it’s normal to rush through a project… traditional wallpaper can’t just be removed, repositioned, and re-smoothed out a pasted covering.” The Spruce In another: “An amateur wallpaper job leaves too much room for error… If not prepared and applied correctly, a rookie installation can lead to pricey mistakes.”
Signs of rushing
- Installing before other renovation work is done (painting, flooring, wiring) → wallpaper gets scuffed or damaged.
- Not checking alignment or cleaning excess paste immediately.
- Not trimming edges properly or overlooking corners/outlets.
- Skipping drying or waiting times for adhesive.
What to do
- Schedule installation as one of the last steps in a room-revamp (after painting, wiring, flooring).
- Allocate sufficient time: installation, drying, trimming, clean-up.
- Work panel by panel carefully—do not skip smoothing or checks.
- Ensure you have all tools ready beforehand (paste, smoothing tool, knife, seam roller, trimming tools, measuring tape, level).
- If doing DIY, pick a day when you can focus without interruption.
8. Mistake #8: Poor Trimming, Edge Finishing & Clean-Up
Why finishing matters
Even if the major part of the job is well executed, poor finishing can degrade the overall look and durability. Edges peeling, mismatched corners, visible adhesive residue or untrimmed excess weaken the finish and make the job look unprofessional. One article quotes: “Use a clean bucket with fresh water and a new sponge to wipe down the wallpaper as soon as you finish… You will find instructions on smoothing and cleaning on the wallpaper label.”
Common finishing errors
- Leaving excess wallpaper at the top or bottom that catches dust or gets damaged.
- Not trimming around light switches, power outlets, radiator pipes, or corners.
- Visible adhesive or paste residue on wallpaper surface (sticky patches, shiny spots).
- Seams not pressed flat; corners not neatly wrapped.
- Not cleaning immediately after installation; adhesive dries and becomes difficult to remove.
Best finishing steps
- Once a strip is hung, use a trimming knife to remove excess top and bottom before adhesive fully dries.
- Use seam roller to press seams gently to ensure they are firmly bonded.
- Wrap wallpaper neatly around corners; if inside corner, overlap correctly per instructions.
- Clean off excess adhesive with a damp sponge (not wet) immediately after installation.
- Protect newly installed wallpaper for 24-48 hours (no heavy traffic, furniture moving, or cover floors to avoid damage).
- Store leftover rolls safely so they’re usable for any future touch-ups.
9. Mistake #9: Neglecting Environmental Conditions & Maintenance
The environment matter
Wallpaper installation isn’t just about the wall and the paper—it also depends on the room environment (temperature, humidity, light exposure) and how the wallpaper will be maintained. Mistakes occur when these factors are ignored. For example: “A possible cause for seams opening after wallpapering could be… too fast drying of the individual strips.”
Maintenance issues
- Installing in a humid room without using moisture‐resistant wallpaper → risk of peeling or mould.
- Using wallpapers in direct sunlight without checking for UV resistance → fading.
- Picking delicate wallpapers for children’s rooms, causing stains or damage.
- Not advising homeowners on how to clean or maintain the wallpaper (e.g., type of cleaner, avoidance of abrasive scrubbers).
What to account for
- Match wallpaper type to room conditions: vinyl for bathrooms/kitchens, washable finish for kids’ rooms, UV-stable materials for sun-facing walls.
- After installation, provide care instructions to the homeowner (or your client) so they know how to clean, what to avoid, and when to inspect for repair.
- Advise on ventilation: good air flow helps adhesives set properly and avoids moisture issues.
- Check if the wallpaper is removable/re-pasteable for future redesigns (a good selling point for Eximus Wallpaper).
- Periodically inspect for any seams lifting, fading, or damage and address early to maintain the look.
10. Mistake #10: Underestimating the Cost & Expertise
Why this happens
Many assume that selecting a wallpaper for wall and sticking it on is a simple job. But the reality is that wallpaper installation, when done right, involves materials, time, expertise, and finishing. Designers say: “Wallpaper is an investment… Professional installers know everything about the type of papers, patterns, and placement before the installation to guarantee a flawless result.”
The risks of cutting corners
- DIY without adequate tools or knowledge can result in errors requiring rework (and expense).
- Using cheaper wallpaper without checking quality/specification may save upfront but cost more in replacement.
- Hiring installers without checking credentials or previous work; mistakes may not be evident until much later.
What to plan for
- For users of Eximus Wallpaper, offer installation services or pre-qualified installer partners to ensure quality.
- When selling wallpapers, provide guidance on approximate cost of installation (labour + materials) so buyers don’t undervalue the job.
- Consider offering premium installation packages (surface prep, pattern layout, finishing) as an upsell.
- In your blog, link to your service offering page: e.g., “Professional installation by Eximus Wallpaper certified teams”.
- Highlight that investing in quality now avoids re-doing in 3-4 years.
Conclusion
Installing the right wallpaper for wall can dramatically elevate the look and feel of your interiors — turning an ordinary space into a designer statement. However, true transformation happens only when every step of the process is done correctly — from surface preparation and material selection to precise installation and aftercare.
At Eximus Wallpaper, India’s first wallpaper manufacturer, we’ve spent years perfecting the craft of designing and installing premium wallpapers tailored for Indian homes. Our expertise ensures that your wallpaper for wall not only looks stunning on day one but also stays flawless for years to come.
Whether you prefer modern geometric patterns, classic damasks, textured neutrals, or bespoke wall murals, we offer a wide range of wallpaper for wall that combine design innovation with durability. Each roll is crafted with superior quality, vibrant printing, and easy-to-maintain finishes — so your walls remain as captivating as the day they were installed.
By following the guide above and avoiding common installation mistakes, you can save time, reduce wastage, and achieve a professional finish that truly enhances your home’s personality. And if you ever feel unsure about DIY installation, our expert team is here to help you with end-to-end consultation, measurement, and fitting services.
✨ Transform your home with confidence — choose Eximus Wallpaper for high-quality, long-lasting wallpaper for wall solutions that bring beauty, texture, and life to every room.
Discover the perfect wallpaper for wall for your home today. Visit eximuswallpaper.com to explore our latest collections, get expert installation support, and redefine your interiors with India’s most trusted wallpaper brand.
Follow the Eximus website and YouTube channel, connect with us on social media platforms like Facebook, Instagram and Explore Our Collection of Designer Wallpapers call us at +91 8828151202